Zootaxa Digital Imaging GuideVersion 1.2, November 2012 1) Introduction. Here a somewhat lengthy guide to digital imaging specifically designed for Zootaxa is provided. The file preparation guide is given specifically for Photoshop, most likely the most widely used imaging application. Other applications may be used as long as a publication quality file is achieved. Zootaxa neither requires the usage of nor endorses any particular product. QUICK SUMMARY
SUGGESTED FURTHER READINGS.
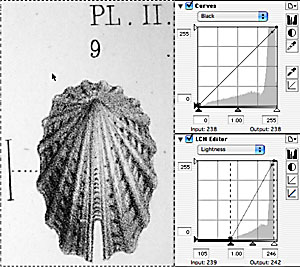
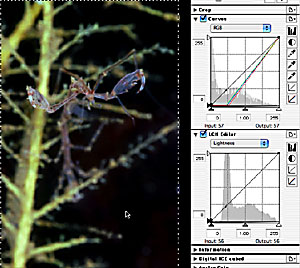
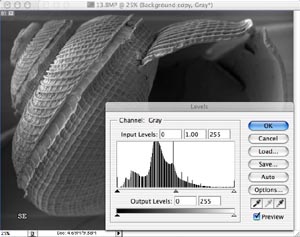
SCANNING, DIGITAL SOURCE FILES 2) Source files. COLOR SPACE. Black and white material should be scanned in greyscale mode for pictorial (half-tone) images, and as bitmap (black and white only) for line art. Color material is best scanned in RGB (Red Green Blue) mode [Note for the technically inclined: Adobe 98 RGB, Prophoto are good choices]. RGB is preferred over CMYK (Cyan Magenta Yellow Black) as it has a larger color gamut (more colors), and is the color space used by all monitors. Additionally, jpegs created from CMYK files are unreadable in many programs. Zootaxa accepts both RGB as well as CMYK files for color images. PLEASE send B&W images as B&W files (No RGB/CMYK/index color SEM images, unless colorized). RESOLUTION. For Zootaxa, the required resolution for half-tone images is 300 dpi (dots per inch), for bitmap files it is 600 dpi. The maximum size of illustrations in Zootaxa is 17 x 25 cm = 6.693 x 9.843 inches. Therefore, the maximum image size in pixels at 300 dpi 2008 x 2953 pixels, and at 600 dpi = 4016 x 5906 pixels. The scan resolution is taken for the size of the original, not the target size. Example: A 35 mm slide is 36 mm wide. For a full width picture in Zootaxa, the slide has to be scanned at (17 cm/3.6 cm) x 300 dpi = 4.72 x 300 dpi = 1417 dpi. As most images will be cropped, scan the image at up to twice the minimally required resolution, for a slide, for instance, use 2000 dpi. Most scanning software allows any resolution to be used when scanning. Some older software may only have a number of steps, in the latter case, always choose at least the next higher setting then what is required. FILE TYPE. Save all half-tone files as .tif files without LZW compression. Save bitmap files as bitmap. DO NOT SAVE ORIGINAL SCANS AS JPEGS, GIFS, OR ANY OTHER COMPRESSED FILE FORMAT. [Note for the technically inclined: compressed file formats such as jpeg reduce the amount of image information, i.e., delete some of the data. This deletion is carried out every time an image is saved in jpeg mode, hence the image gets progressively degraded. This degradation is visible, particularly in print, when color or B&W stripe patterns appear, instead of continuous tonal gradients.] SCAN ADJUSTMENTS. Most scan software allows some pre-scan adjustments. These can often be accessed through a tools palette; otherwise consult the documentation for your scanner/software (example below is for the Nikon SuperCoolscan 4000). The histogram will show the spread of greyscale values from 0 = black to 256 = white [this range is for an 8 bit scanner. There are some scanners that will allow more values, up to 16 bit. Use 16 scanning and files if you will need to make major adjustments to images, or if you need fo bring out detail in the deep shadows or brightest highlights.]. Usually, at the bottom of the histogram there are three triangles: black, grey, white.
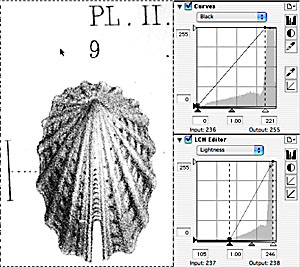
Place the black/white triangles at the end points of the histogram. The grey triangle will shift proportionally. If the histogram does not show a nice bell curve, adjust the position of the grey triangle towards the modal class of the histogram. Often, the grey point is best set in the mid-slope adjacent to the modal class of the histogram. There are, however, no set rules: see what is pleasing to the eye and shows all the features you want to illustrate. In some cases (for instance a dark object photographed on white paper), there will be a range of light values showing all the detail of the paper structure. As the paper structure bears no germane information, all the whitish values can be made all-white. Slide the white triangle to the left, until highlight information in the dark specimen is lost. Then move the white triangle back a few points (5–10). This adjustment will make the structure of the darker object more prominent, i.e., help to emphasize the features you want to show. Similar adjustment can be carried out for unimportant dark areas.
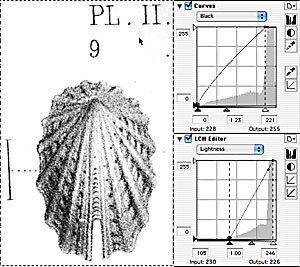
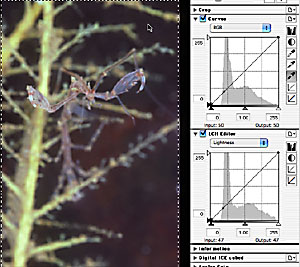
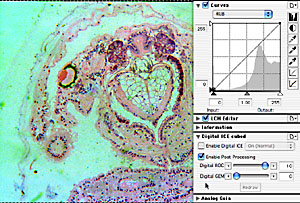
Occasionally, detail in the shadows or highlights is insufficiently shown. Some scan software allows adjustment of the curve. Curve adjustments are mostly trial and error, so try adjustments until the contrast is as desired. You can always cancel. An example of curve adjustments in Photoshop is shown below. SUMMARY: Do adjust the greyscale (the triangles). If necessary do some curve adjustment, though additional fine-tuning can be carried out in Photoshop. The better the original scan, the better the final product. COLOR ADJUSTMENTS. This is the most difficult part. If you are somewhat experienced, you can do initial adjustments in the scan sofware. Often you can adjust the curves for each of the colors/alpha channels: red, green, blue. Alternatively, some scan software allows designation of a white reference point and a black reference point with eye-dropper icons. When hunting for the lightest and darkest points of your image, watch the brightness values in the info area for R, G, and B. Once the highest values have been obtained, click the eye-dropper for the white point. Do the corresponding actions for the black point. This procedure works fairly well.
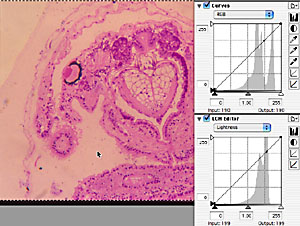
USE OF ROC, ICE3. 2B. Digital original files. RESOLUTION. Save all files at the highest available resolution. Often this is still too low for the required resolution for Zootaxa. Upsampling of images is best carried out with GenuineFractals; resolution can also be increased in Photoshop (under the menu options Image: Image size), though results are somewhat lower in quality. Expect visible image problems when the file is upsampled more than four times in linear dimension from the original size (first generation SEM digital captures). FILE PREPARATION AND MANIPULATION FOR HALF TONE IMAGES 3. Cleaning images. To remove small dust, use the Photoshop filter under the menu options noise: dust and scratches. A good balance between removing dust while preserving image detail is found with the following settings: diameter = 2, threshold =12–14. Photoshop gives a preview of the result. If too much/too little is removed, first adjust the threshold, while keeping the diameter small. Next, view the original scan in Photoshop at 100%. Any visible irregularity has to be corrected. Good results are obtained with the healing brush (the band-aid icon in Photoshop 6 through CS6) and the cloning tool (the rubber stamp in Photoshop). Suitable brush size is 9–13 pixels in diameter with feathering set to 25%. Check the Photoshop manual on how to adjust brush sizes; there are major differences between earlier versions (<=5), and more recent releases (>=6). 4) Adjust overall contrast/tonality.
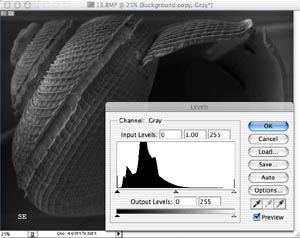
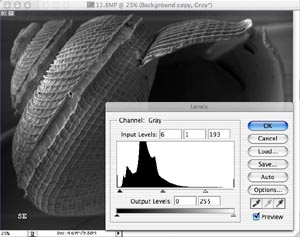
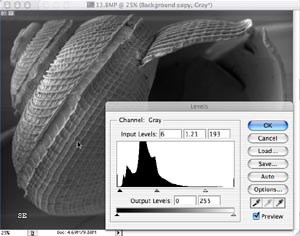
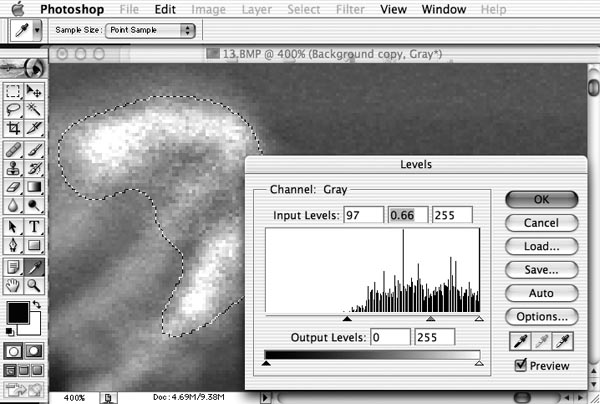
Place the black/white triangles at the end points of the histogram (top right image below). The grey triangle will shift proportionally. If the histogram does not show a nice bell curve, adjust the position of the grey triangle towards the modal class of the histogram. Often, the grey point is best set in the mid-slope adjacent to the modal class of the histogram (bottom left image below: note grey point is at 1.21). There are, however, no set rules: see what is pleasing to the eye and shows all the features you want to illustrate. Click ok. If you recheck Levels (bottom right image below), the histogram will be somewhat jagged. Don't worry, it will smooth when downsampling image towards the end.
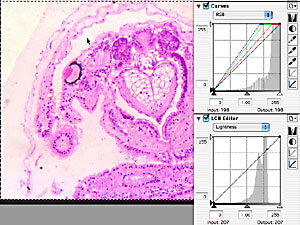
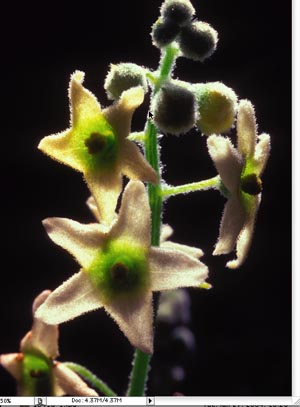
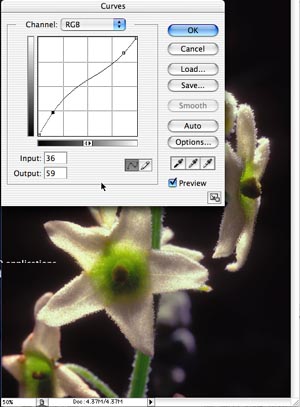
In some cases (for instance, a dark object photographed on white paper), there will be a range of light values showing all the detail of the paper structure. As the paper structure bears no germane information, all the whitish values can be made all-white. Slide the white triangle to the left, until highlight information in the dark specimen is lost. Then move the white triangle back a few points (5–10). This adjustment will make the structure of the darker object more prominent, i.e. help to emphasize the features you want to show. Similar adjustment can be carried out for unimportant dark areas. For examples, see above under scanning adjustments. Sometimes, adjustments using Levels will not do. In extremely contrasty pictures, neither the white nor the black areas show needed detail (image below left). Use Photoshop Curves (command-key M). Place an adjustment point in the dark area and move the curve up, i.e., make the bottom left portion of the curve steeper: notice the improved detail in the dark, though the white areas are washed out even more. Place a second adjustment point in the upper right hand portion of the curve and pull it down. Now the top right portion of the curve plunges down steeply. The overall shape of the curve is now sinusoid with the middle being flatter (image below right). Experimentation will indicate the best result. After applying curves, recheck Levels.
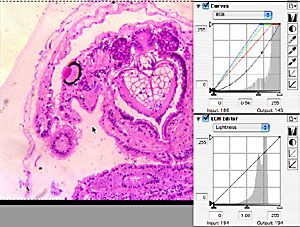
5) Adjust overall color. [Note for the technically inclined. For optimum color adjustment a properly calibrated monitor and a thorough understanding of .icc-profiles and color spaces is necessary. Calibration of a monitor should be carried out with an external calibration spider such as Monaco Optix or ColorMunki. As supplemental reading Fraser et al. (2005: Real World Color Management, Second Edition. Peachpit Press, Berkeley, 582 pp.) and Rodney (2005: Color Management for Photographers. Focal Press/Elsevier, Amsterdam. 461 pp.) will prove invaluable. Taking advantage of LAB color-space in many cases will produce superior results compared to work in RGB. E.g., increases in color saturation in a and b channels do not affect lightness/brightness of the image areas; un-sharp masking in l-channel will only accentuate brightness differences, but will not introduce color patterns. See Margulis (2006. Photoshop LAB Color. Peachpit Press, Berkeley. 366 pp.) for details.] There are many ways of adjusting color in Photoshop. Possibly the simplest way is using Curves (command-key M). Curves allows to designate a white reference point and a black reference point with eye-dropper icons. When hunting for the lightest and darkest points of your image, watch the brightness values in the info area for R, G, and B (Palette: Info). Once the highest values have been obtained, click the eye-dropper for the white point. Do the corresponding actions for the black point. This procedure works fairly well. For examples, see above under scanning. If this should not work, try to adjust the curves of the
individual alpha channels. Above the curves graph is a pull-down menu;
initially "RGB" is selected. If your image is too blue, choose
"B" for the blue alpha channel and pull the endpoint of blue
down; Photoshop will give a preview of the altered image. If then the
image is too green, choose "G" from the pull-down menue and
lower the green curve. This procedure will require trial and error:
go back and forth between the channels until the best possible result
has been obtained. After the color cast has been corrected, re-check levels. Curves is superior to Variations as well as Color Correction, because Curves affects the image over the entire range of brightness values, whereas in Variation/Color Correction, the adjustments have to be done for highlights, midtones, and shadows independently. If you are comfortable using one way of adjusting color and get good results, there is no need to change your ways. Usually, color saturation has to be increased. Often, a preliminary adjustment is carried out in the scanner software. In Photoshop, use Hue, Saturation (command-key U), and slide the saturation ruler to the right until a pleasing image appears. [Alternatively, in LAB color space, increase the slope of the a and b curves, while keeping the curve run through 0,0.] 6) Local adjustment of contrast/tonality
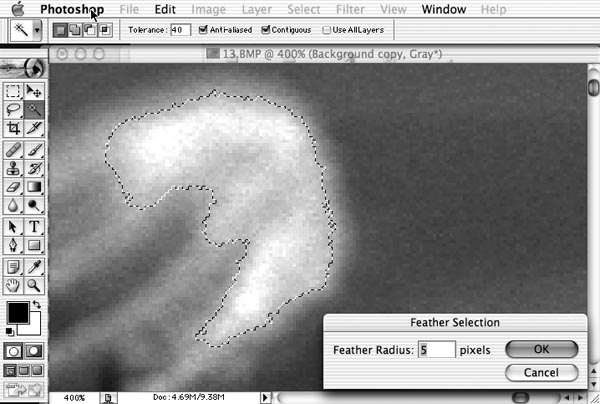
and color. IMPORTANT: before adjusting the contrast/tonality or color of the selected area, it must be feathered, which makes the margins of the selected area softer. If this is not done, unacceptable tonal breaks will become apparent. Under select, choose feather. Feathering can be made at values from 0.5 – >100: this determines the linear extent over which the softening of the effect will occur. 0.5 = a very sharp change, 50 = a very gradual change (top image below: feather radius 5 selected; notice smoother margins of selection in bottom image). The best setting is a matter of experimentation and experience, and depends on the particular image. With the feathered selection, make the desired adjustments: levels, curves, saturation, ... (bottom image below).
In Photoshop CS1-6, one can also use Image-Adjustments-Shadow/Highlight .... In the dialog box, click on "Show more options". In the Shadows and the Highlights box, move the Amount and Tonal width sliders all to the left. Adjust Radius to 10–30 pixels as usually good starting values. In Highlights, move the amount slider to 70–100%, then start sliding the Tonal width triangle until the highlights are no longer blown out. Adjust Amount and Radius to check for improved results. Do the same for Shadows. 7) Cut outs. 8) Assembling plates. Copy - Paste or drag elements into the target file; the elements will automatically be placed into new layers. If you need to re-size elements, select all (command-key A), choose Image-Transform-Scale, and hold down the shift key while dragging one of the corners until the desired size has been obtained. The shift key action will force the image to be modified proportionally, thus avoids distortion of the image. Use separate layers for scale bars, separation bars, and lettering. For complex plates, you can group layers into directories/folders, e.g., folder with images, folder with part letters, folders with arrows, etc. Layered files can be saved in Photoshop format (.psd) or .tif-files. These are lossless formats, hence are suitable for further image manipulation. Keep a copy of the layered file as the master file at very least until the manuscript has been published. 9) Remove excess borders. FILE PREPARATION AND MANIPULATION FOR LINE ART 10) Scanned images. Images need to be cleaned as for half-tone images, though dust and scratches filter cannot be applied to bitmap images. Levels and curves do not apply. Composite figures can be produced as for half-tone images, and labeling is added as needed. 11) Vector graphic files. If a line-art tif file is too low in resolution, DO NOT UPSAMPLE. Start over from the original vector graphics file, and re-export at higher resolution. SUBMISSION FILES 12) Pre-submission check of final
files. Recheck Levels and sharpening for each image layer. This should not need any adjustments. Note that the histograms are smooth now, whereas before they may have been jagged. IMPORTANT. Adjust levels/curves BEFORE reducing file size, otherwise jagged levels will become apparent. Layered files should be flattened (Layers: Flatten image) and saved as TIF files. To make electronic transmission easier, files MAY be transmitted as LZW-compressed TIF files, or as highest quality jpegs. IMPORTANT. Although jpeg file format is permissible to ease electronic transmission, DO NOT MAKE ANY IMAGE ADJUSTMENTS IN JPEGS. The only permissible jpeg-function is "save as jpeg: maximum quality". 13) "Sharpening" - Unsharp
Mask.
Unsharp mask can be carried out before or after downsampling to 17 cm @ 300 dpi. If done before, the levels histogram will be very smooth in the final image, though the image becomes slightly softer after downsampling. If done afterwards, the levels histogram becomes slightly more irregular, but the desired sharpness level is retained. [For color images, unsharp-masking in the l-channel of LAB color space often produces better results with no color artifacts.] NikSharpener is a good utility/Photoshop-plug-in for output sharpening. For details on digital sharpening, see Fraser, B. & Schewe, J. 2010. Image Sharpening with Adobe Photoshop, Camera Raw, and Lightroom. Second Edition. Peachpit Press, Berkeley. 345 pp. 14) Submission files. PRINT IMAGE FILES 15) You will receive further instructions once your ms is close to being accepted for publication.
|